

NOTHING SAYS you’re the coolest kid in town like a tricked-out treehouse—an adult-free zone that’s the perfect respite from the ’rents. But most treehouses are shoddily constructed and fall apart after a few years. The reason? Amateur architects (thanks, Dad) usually just nail everything to the trunk. Building a structure that can support all the cool stuff you’ll want to include—balconies, rope bridges, trap doors—requires a solid platform that will move with the tree as it grows.
“You can’t treat a living tree like a post,” says Daryl McDonald, lead foreman at Nelson Treehouse and Supply in Fall City, Washington. “It’s growing, it’s moving in the wind.” Of course, unless you’ve been mowing lawns since you were two, you’re probably going to need your parents to chip in. So here’s what you do: wait until your birthday, then slip them these instructions.
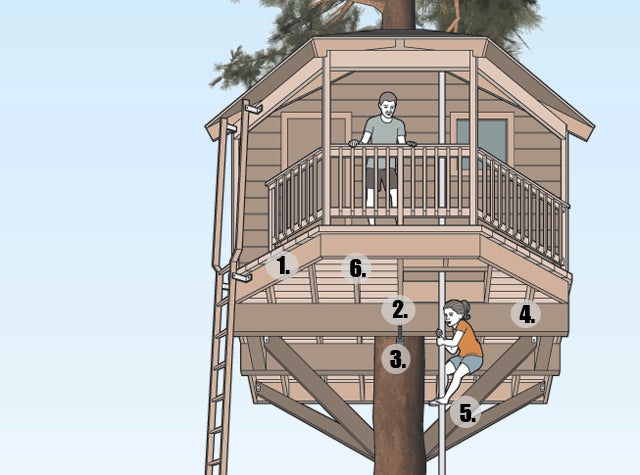
1. SELECT THE PLATFORM
sells plans for nearly any tree configuration (from $100). Single-tree designs like this one are the most popular. All you need is a straight trunk at least 24 inches in diameter. (See sidebar for the installation blueprint)
2. CHOOSE THE RIGHT ANCHOR
Nelson uses what it calls a treehouse attachment bolt (TAB)—a twelve- or twenty-four-inch steel rod that’s screwed into a tree’s heartwood. Each TAB runs about $250 and can support upwards of four tons. More importantly, it allows the tree ample space to grow.
3. ATTACH THE BOLT
Bore out a pilot hole in the trunk with a one-inch bit, then use a three-inch bit to widen the opening. Insert the TAB and crank it into place with a pipe wrench. The wound may look big, but the tree will heal itself by clotting the area with sap, turning the TAB into an artificial limb.
4. INSTALL THE BEAMS
These are mounted on the TAB and will hold most of the weight of the house, so use burly wood. This design calls for two 12-foot-long four-by-tens.
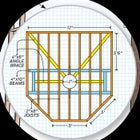
5. ADD SUPPORTS
Four-by-six angle braces, anchored to the tree with ten-inch lag screws, will help prevent the frame from bending or shearing under heavy loads.
6. FINISH IT OFF
Screw two-by-eight joists together to create the deck’s frame, then cover it with two-by-six decking boards. Add walls, railings, zip lines, rope ladders, and fire poles to taste.