


BUY SOME P-TEX Those little scrapes slow you down. Light a P-Tex candle (1), drip the melting material into the scratches (2), let it cool, and carefully plane off the excess with a sharp scraper (3).
DEBURR Run your fingers down the edges to find rough spots (4). Work burrs off with the course side of a shop stone (5). A burred edge will make you lose control on hardpack and will feel hooky in powder.
SHARPEN Invest in a tool sharpener, like the Wintersteiger Easy Sharp Extra File Guide ($39; ). It comes with a file and stone, and you can adjust the edge-bevel angle to your preference. Most skiers like a one-to-two-degree bevel on the side edge, and one degree on the base.
WAX Rub-on paste waxes last only a few runs and don’t protect your base. Every three to five ski days, melt a bead of universal wax onto your base with a warm iron (6) and use the iron to work the wax in (7).Let it cool, remove the excess with a plastic scraper (8), and finish it with a nylon brush (9).
GRIND Find the right ski shop by asking local racers where they go. Tell the shop tech where and how you ski. Even if you ski a lot, two machine grinds a year should be enough.
Supplies: P-Tex drip candles, steel scraper, deburring stone, gummi stone, pocket sharpening tool, waxing iron, universal hot wax, plastic scraper, nylon wax brush Find Them:
,,
Climbing Skins 101
Less futzing with climbing skins means more time skiing. Here are a few helpful tips.
Climbing Skins
GO WIDE Forget what the skinny-skied old-timers say. Get a skin as wide as the broadest part of your skis, and trim it to fit the sidecut for maximum grip on steep, firm slopes.
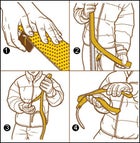
TRIM RIGHT To cut, affix the skin to the ski and trim from tip to tail, holding the cutter with the fat side down and the blade on top. Use the ski edge for stability by pressing the blade against it as you cut (1). After you’ve finished the first half, shift the skin over to expose one cm of the base on the side you’ve cut, then trim the other side. When you center the skin, it will leave five mm of edge on either side of the ski to sink into anything dicey.
FOLD SMARTER Common error in the field: folding skins in half. Save your muscles, and avoid wind-induced flapping, by folding the skins into quarters. Starting at the tail, peel half of the skin. Now fold that half onto itself, glue to glue (2). Peel the rest of the skin off to the tip, and do the same (3). Finally, fold the skins in the middle (4).
DE-ICE If your glue freezes, scrape the ice away with your ski edge. Then thaw it out by stuffing the skins into your jacket pocket, instead of your pack. Backup plan: Bring three or four 12-inch Voile straps ($4; ) and tie skins in place.
Supplies: Skins and Cutter:
, , ,
How to Build a Snow Cave
Ask ten people how to make a snow cave and you'll get ten different answers. Winter-survival expert Greg Davenport, 49, ends the debate. Here's his definitive guide to making a bomber backcountry bunker.
How to Build a Snow Cave
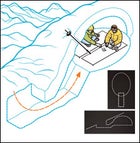 ��
��1. Ideally, find a low-angle slope (15 degrees or so) with a five-foot base and chunk-free powder. Start out facing uphill. Remove the snow in front of you until you’ve carved out a platform and are facing a wall four feet high.
2. Start tunneling into the bottom of the wall to make a door. The tunnel should be a little wider than your shoulders with your elbows slightly out. Dig straight into the hill until your torso can fit inside. Work slowly to prevent overheating and getting soaked by sweat or melting snow.
3. Dig up and forward to hollow out the main chamber. Keep the sleeping platform higher than the top of the door to trap heat. It should be flat and just big enough to allow you and a buddy or twono moreto lie down.
4. The walls and ceiling need to be arched and at least 18 inches thick. (Measure with a probe if you’re in doubt.) Allow about six to eight inches of room overhead when you’re sitting upright in the center.
5. Stick a ski pole into the ceiling at a 45-degree angle, handle down, to create an air vent. Keep it in place overnight. If it storms, you can open the vent without exiting by pushing the pole up so the basket clears away the snow.