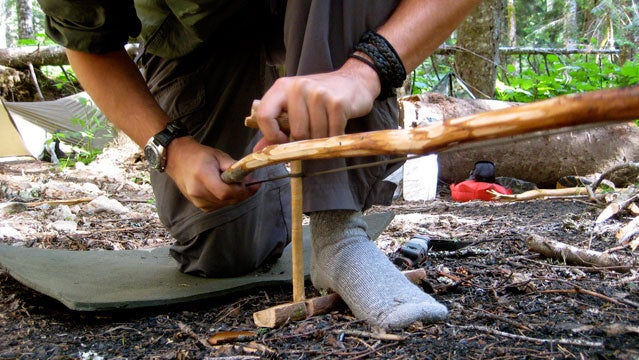
Before the Bic, matches, and flint & steel, there was the art of rubbing two sticks together. A nearly forgotten skill in modern outdoor education.
The bow-drill is a method used throughout the world, particularly in the colder regions of the North such as Alaska and Canada. Down my way in the desert, it was the hand-drill method. If I had to choose between the two in a real survival situation (which means I screwed up and wasn’t prepared!), I would take the bow-drill as it relies on mechanics and not arm strength.
The bow-drill method universally employs three underlying principles that are critical to success:
1) Soft, non-resinous wood like yucca, cedar, or cottonwood must be used for the drill and fireboard.
2) A skillful combination of speed and downward pressure must be employed if the proper level of friction is to occur.
3) And practice. You don’t want to try this out for the first time when you’re truly lost.
This is a skill best learned from someone versed in primitive firemaking, but here are a few tips if you want to at least assemble your own set.
You will need four materials:
First, carve a drill about “10” long and finger thick. As noted, this should be made from a soft, non-resinous wood.
Second, carve a flat fireboard of soft, non-resinous wood that is about the same thickness as your drill’s diameter. Mine are usually 12″ long by 2″ wide. Avoid resinous wood such as pine as the sap will cause convective cooling and not allow for the formation of a coal. My personal favorite combination: use cottonwood for a fireboard with a drill made from a dried yucca stalk.
Third, you will need the bow. Don’t think compound hunting bow here. A curved willow sapling that is as long as your outstretched arm and an inch thick will suffice. You will need to carefully notch both ends to hold the aboriginal nylon rope in place. I often use 1/8″ diameter rope or para-cord rope. Once, I used a bootlace of mine on a cold, windy night in the Great Basin Desert but that, as they say, is another story.
Lastly, you will need a handhold or socket to secure the non-burning end of your drill. This will fit in your palm so it should be comfy. My favorite is an old elk knuckle that has seen hundreds of fires but I’ve also used a palm-sized, dead oak limb that I carved a depression in.
So that’s a complete bow-drill set. For any fire-by-friction method you will also need a finely-shredded bark bundle to cradle your hard-won coal and send it on its way to flame.
Finally, once you learn the skill, practice, practice, practice. This is a method that the ancient peoples grew up using on a daily basis so it takes time to develop proficiency. Oh yeah, caveman grunting and occasional cussing helps too when performing this skill in the beginning!
Once you have made your first or your hundredth fire this way, you will always appreciate the magic of the old ways and realize that our ancestors weren’t so “primitive.”


