


High Power
When To Go
May to Mid-JunePROS: Fewer crevasses, few crowds, option of a more direct route
CONS: Weather can be fickle, higher avalanche risk, brutal cold
Mid-June to August
PROS: Good weather, clear trail
CONS: More uncomfortable rock hiking in crampons, more crowds
September
PROS: Few crowds
CONS: Fickle weather, more crevasses, rock hiking, convoluted route
Climb Rainier: Here's How
Doug Schurman’s interactive six-month training plan will help you reach the summit.“DO NOT FALL,” shouted Garrett Stevens, a guide with Rainier Mountaineering Incorporated (RMI).
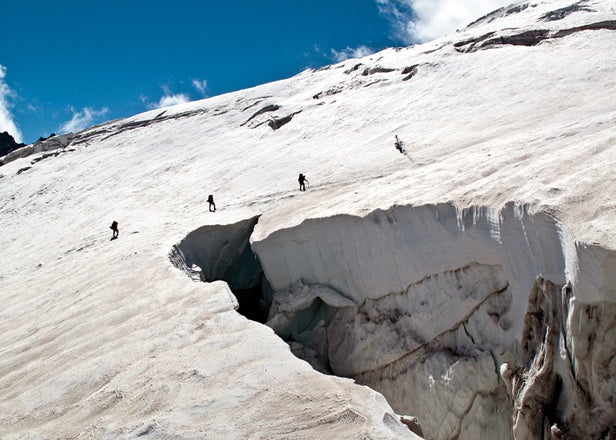
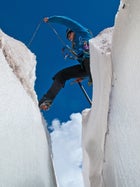
It was 2:30 in the morning, and our four-man team was traversing Mount Rainier’s Ingraham Glacier. In the moonlight, a monstrous crevasse was visible about 50 yards down the icy 30-degree slope below us. The thin snow trail, packed and then eroded by previous teams, narrowed to a boot-width ledge.
If it weren’t for the crevasse, crossing this section would be like walking along a curb. But tied to a string of groggy guys wearing snag-prone crampons in the middle of the night, above an ice luge to an abyss, it was not the time to be wishing I’d trained a little harder for this climb.
Not that any part of a Rainier climb is friendly to couch potatoes. At 14,410 feet, it’s the fifth-tallest peak in the lower 48 and the most heavily glaciated, rising almost two vertical miles above the surrounding terrain and riddled with deep crevasses. The weather can go from mild to nightmarish in a matter of hours, and the 9,000-foot altitude difference between the base village and summit makes the upper slopes seem twice as steep. It’s no wonder the mountain is considered a classic stepping stone to the Himalayas.
Which is why it’s so surprising that you can safely join a Rainier expedition without any real technical climbing skills. In fact, the three guiding services on the mountain actually welcome beginners. As I found out on my climb with RMI, they handle everything: teaching and honing essential skills, picking the route, organizing gear and food, analyzing weather and snowpack, and making the key judgment calls, like deciding when a wheezing team member needs to head back to camp. All you have to do is show up in top shape.
Any climbing team moves only as fast as the slowest member, but this factor is magnified on a guided expedition, when you’re roped up with three strangers (with other teams lined up behind and in front of you), climbing and descending almost two vertical miles in less than 30 hours. Sure, a reasonably fit person with a good guide can suffer their way up and down Rainier. But that’s not fun—and it’s not fair to your teammates. Your goal isn’t just to survive as dead weight. As our leader, RMI’s co-owner and 25-year veteran guide Peter Whittaker, said during our first orientation, “you need to ask yourself one question: Am I an asset to my team or a liability?”
The best way to make sure you’re the former is to start building fitness specific to mountaineering about six months before the climb. It takes that long to develop the kind of lower-body, core, and aerobic conditioning to make you a hiking and pack-carrying machine. (Plus you need to reserve a spot with a guiding service that far in advance; by the end of January, prime-season trips are often booked out.)
Thankfully, everyone on my team had shown up fit and ready to climb. On summit morning, after quickly traversing the Ingraham Glacier, we scraped our way up the chossy volcanic rubble of Disappointment Cleaver in the dark, then weaved through a dozen crevasses as the rising sun turned the glacier amber and pink. As we closed in on the rim of the almost perfectly circular crater on top, we blew past team after struggling team. By 7 A.M., we were fist-bumping and mugging for photos on the summit, feeling strong enough to savor the moment, wishing there was some way to go even higher.
Peak Fitness
Get in shape to climb Mount Rainier.
Training Plan
 . For an enhanced, multimedia version of this training plan, go to outsideonline.com/fitnesscenter.
Muscle Up
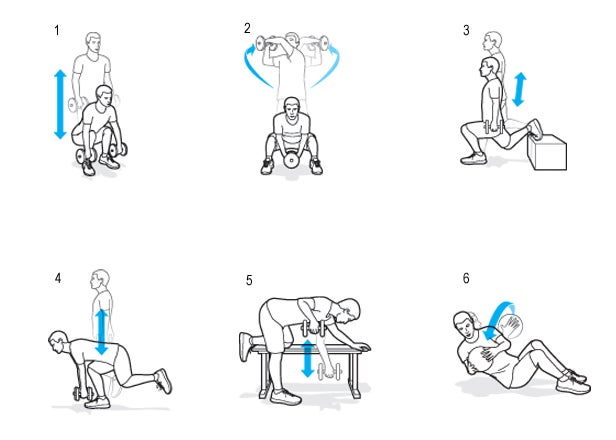
Alternating these two groups of strength exercises will prep your legs and core to climb and descend well with a loaded pack.
Pro Tip: Reps
In resistance training, a low number of repetitions with higher weight develops maximum strength for short periods—say, five-to-ten-second bursts; more reps with less weight builds your strength for longer efforts. No matter how many reps you do for each of the exercises here, keep the weight light enough so you can complete the entire set with good form and still have one rep in reserve.ROUTINE 1
Dead Lift (1)
Squatting with a straight back, thighs parallel to the floor and knees behind your toes and pointing straight forward, grip two heavy dumbbells or a barbell in front of your ankles. Keeping your back straight, push up from your glutes into a standing position and lower slowly back to the start.
Push-ups
With your back straight, abs tight, and hands shoulder width apart, keep your head in line with your spine and look at the floor. Don’t lock your elbows at the top.
Step-ups
Find a bench or ledge that’s between 12 and 28 inches high and put one foot on it. Holding light dumbbells or wearing a loaded backpack, push off your upper leg to step up on top without weighting your lower leg, keeping your back straight above your hips.
Pull-ups
Use an overhand grip, hands shoulder width apart. Never extend your arms completely straight, and make sure your chin clears the bar. If you can’t complete all the reps the training plan calls for, put a chair beneath your feet and give yourself a boost.
Snow Shoveler (2)
With feet a little wider than shoulder width, hold one dumbbell (or a backpack or medicine ball) in your hands below your chin, and get into a squat position (straight back, knees behind toes, thighs parallel to ground). As you push up from the thighs and glutes, lift the weight over one shoulder as if you were shoveling snow; keep a straight back and tight abs. Alternate sides.
Standing Calf Raises
Stand with toes on the edge of a stair and, wearing a heavy pack (or holding a heavy dumbbell), lower your heels as far as is comfortable, then raise them as high as you can.
ROUTINE 2
Rear-Foot-Elevated Squat (3)
Stand with your rear foot behind you on a bench. Holding a light dumbbell in each hand, drop down as if you’re doing a lunge until you nearly touch your rear knee to the ground. Keep your front knee behind your front toes.
One-Leg Deadlift (4)
Stand on one leg while holding dumbbells in both hands. Bend forward at the waist and touch the weights to the floor, bending your knee as little as feels comfortable. Reverse to return to starting position.
One-Arm Bent-over Rows (5)
Put your left knee and left hand on a bench or chair for support and bend over so your torso is parallel to the ground. Hold a dumbbell in your right hand with your arm extended directly beneath your shoulder. Pull the weight up toward your armpit and slowly lower. Switch sides between sets.
Overhead Press
With feet shoulder width apart, hold two dumbbells at your shoulders, elbows directly below. Press the dumbbells toward the ceiling and slightly forward, keeping your abs tight, shoulders over your hips, and your back straight.
Seated Medicine-Ball Twists (6)
Sit and lean back 10 to 30 degrees. Hold a medicine ball or dumbbell in your hands high above your hips. Lower the ball slowly to one side, return, and repeat on other side. Keep abs tight to support and protect the lower spine.
Dumbbell Shrugs
Hold two fairly heavy dumbbells in your hands with arms straight down. Shrug your shoulders straight up toward your ears. Slowly lower the weights.
Breathe Easier
Reaching Mt. Rainier's summit requires a strong aerobic base, and plenty of hill climbing. Here's how to get both.
Pro Tip: Water Weight
The easiest way to load up for hill training: Fill up a collapsible five-gallon container with water and throw it in your pack. Each gallon weighs 8.3 pounds, and you can just dump the extra ballast when your workout is done. Use a handheld luggage scale to keep yourself honest about your pack weight.Climbing
 Climbing
AEROBIC TRAINING
The best aerobic training for mountaineering mimics what you’ll do on the mountain: long, slow, uphill grinding. Good options include hiking, trail running, stair climbing, and, at the gym, the elliptical trainer, inclined treadmill, and step mill. However you get your cardio fix, here’s how hard to push it for the aerobic workouts in our “Peak Fitness” training plan.
Recovery A very comfortable pace that won’t make you feel tired or breathless (heart rate 65 percent of max)
Moderate You can sustain this intensity for well over an hour and talk in short phrases (HR 65–75 percent of max)
High Highest intensity you can sustain for 30 minutes (HR 75–85 percent of max)
Interval Hard enough that you won’t be able to keep it up for more than one to two minutes (HR above 85 percent of max)
HILL TRAINING
Ups and Downs
Backpack hill repeats help you quickly ramp up your cardio conditioning, lower body endurance, and core strength for intensive mountain hiking with a load. They’re no replacement for putting in long hours hiking in the mountains, but for flatlanders and those on tight schedules, they can be a powerful supplement. (1) First, find a steep trail or stairs that will let you go nonstop for 2-3 minutes. (2) Wear a pack loaded with 30-40 pounds, and warm up. (3) Push your limits. Do each hill climb at your interval pace (see intensity guidelines above). (4) Take it easy on each downhill to recover. Your workout should last 30-40 minutes.
Get on Top
The Camp Muir routes up Mount Rainier are all-time classics. Here's what to expect.
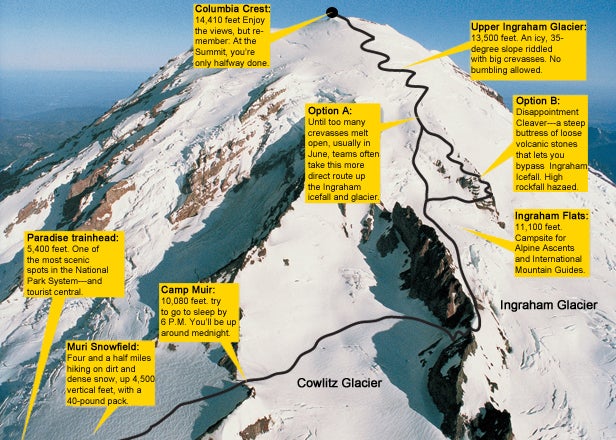
MEET YOUR HOSTS
There are three great guiding services on Rainier, each offering three-and-a-half-day training and summit climbs.
Since 1969, RAINIER MOUNTAINEERING INCORPORATED ($926; ) has guided 70,000 people on Rainier. Clients train at low elevation and spend one night at a spartan midmountain bunkhouse at Camp Muir. The cost doesn’t include food ($126), gear rentals, or two nights of lodging just outside Mount Rainier National Park. INTERNATIONAL MOUNTAIN GUIDES ($1,250; ) and ALPINE ASCENTS INTERNATIONAL ($1,325; ) both began full-scale guiding on Rainier in 2007. Each spends two nights on the mountain—one at Camp Muir and one at a higher tent camp on a glacier—and train midmountain for a slightly more expedition feel. Both include breakfasts and dinners, and AAI tosses in transportation from the airport.