

During a long layover in a major airport the other day, I watched hundreds of people walk and run to their gates. I could see why so many common orthopedic problems, like lower-back pain, hip arthritis, and plantar fasciitis, are caused by how we move. Somewhere along the way, many of us have lost touch with our intuitive gait and developed inefficient patterns, letting the front of our bodies do the work instead of our powerhouse posterior chain. To put it simply, we don’t use our backside—our buns and our guns.
The way we walk is a product of both evolution and learned behavior. Conveniences of modern life impact biomechanics: treadmills don’t require you to push to move forward, some furniture eliminates your need to get up from the floor, and grocery stores are designed so you rarely need to climb or squat to reach food. Cultural influences and footwear choices alter our movement patterns, too: children walk similarly to their parents, people of the same cultural background often display similar gaits, and high heels and cushioned sneakers alike will change your stride.
When you walk, you arms should swing reciprocally with your legs, propelling you with a pattern of extension and flexion. Your triceps muscle engages to draw your arm behind you, stretching the soft tissues of the chest like a rubber band that then releases to spring the arm forward with free, elastic energy. That elastic movement can help offset some of the work done by the front of your body. If you can harness your posterior chain effectively, you also benefit from increased power and endurance from the glutes, decreasing your chance of injury. If you’ve ever dealt with hip-flexor pain, anterior-knee pain, or lower-back pain on a long walk or run, then you might lack back-line participation.
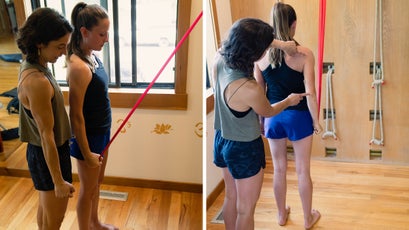
Here are five simple moves that can build back your triceps and glutes and get you moving like you were designed to.
The Moves
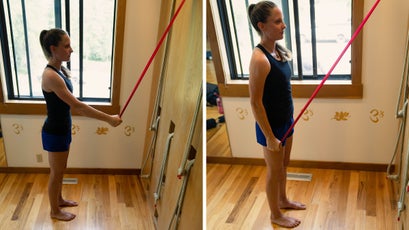
Triceps Toner with Band
What it does: Helps you practice an efficient pattern of flexion and extension in your upper body, while strengthening your triceps. The resistance band encourages you to engage the back of your arm during extension and relax into the forward arm swing.
How to do it: Stand with an exercise band anchored above you. (You can tie a knot at the end of the band and place it over the top of a door. Close the door so that the knot is caught on the other side.) Stand facing your anchor point, and grasp the band with one arm, keeping it straight and extended in front of you at approximately a 45-degree angle. Using your triceps and the muscles behind your shoulder near your armpit, pull back against the band, moving your whole arm straight behind you, past the midline of your trunk. You should feel your shoulder blade slide toward your spine. Then relax and allow your arm to swing forward passively in one smooth, slow motion. You should feel your shoulder blade relax into a neutral position. Keep your elbow straight the whole time. After training this pattern with the band, try transferring this reciprocal action to walking and running so you tone your triceps with every stride.
Volume: One to three sets of 10 to 30 repetitions on each side. Rest one minute between sets. Perform this movement often throughout the week to help retrain your brain.

Bent-Row Triceps Toner with Free Weight
What it does: Works the triceps and muscles along the back of your shoulder. The bent-over position encourages you to stabilize your trunk and engage involved muscles against the free weight and gravity.
How to do it: Place your left knee on a bench, and stabilize with your left fist. Keep your hips and shoulders level. Let your free arm hang perpendicular to the ground, weight in hand. Bend that arm to row the weight up beneath your shoulder, then extend your arm back, behind the midline of your trunk. Be sure to completely straighten the elbow here. You should feel your shoulder blade slide toward your spine. Reverse the move by bending your elbow, releasing your shoulder blade away from the spine, and slowly lowering the weight back to the starting position. Choose a weight that allows you to completely straighten your elbow at the end of the move—it might be surprisingly light.
Volume: One to three sets of five to eight repetitions on each side. Rest two to three minutes between sets. Perform this move one to three times per week.
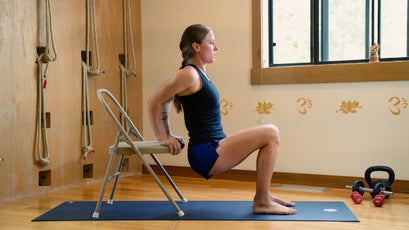
Triceps Dip with Chest Opener
What it does: Shoulder extension might feel foreign, given how much time most of us spend engaged in forward-oriented postures and movements, like typing or texting. This move orients the shoulders into full bilateral extension, allowing us to put the work into the triceps instead of the chest. Folding at the hips while maintaining a vertical spine is an added challenge with an open chest.
How to do it: You’ll need a stable chair and grippy floor surface. Begin with your palms on the chair behind you, fingertips forward. This position encourages the shoulder blades to pull back toward the spine and down toward your buttocks. Keep your trunk vertical, with your hips close to the front edge of the chair. Begin bending both elbows, lowering into the dip. Only go as low as you can maintain good form: shoulder blades squeezing toward the spine, chest broad and open, feet and knees parallel, and elbows narrow behind you. If lowering into the dip feels too hard, just hold the starting position. Push back up to straight elbows and repeat. Keep your back close to the front edge of the chair during the whole movement.
Volume: One to three sets of three to eight repetitions, with two to three minutes of rest between sets. Perform this move one to three times per week.
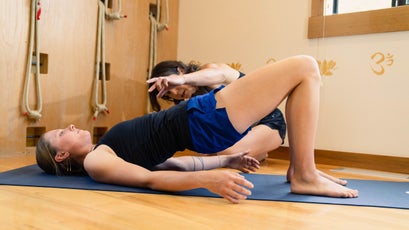
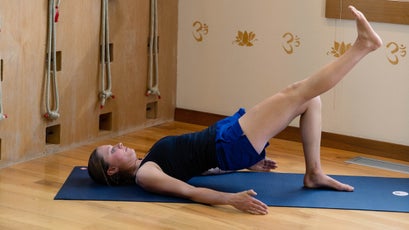
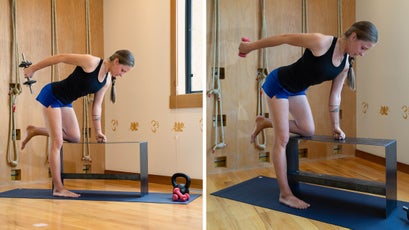
Single-Leg Bridge
What it does: Engages the posterior chain without much margin for cheating. When you have to push your trunk up and forward using a single leg, you get a feel for how much your backside should be working to push you forward when you are walking, hiking, and running.
How to do it: Begin by lying on your back, with your knees bent, your feet flat on the floor and hip-width apart, and your shins vertical. Your arms should rest by your sides, palms facing down. Engage the backs of your shoulders, arms, and hands by pressing them into the floor. Then push your feet into the ground and lift your pelvis up into a bridge, drawing a straight diagonal line from knees to chest. Imagine pulling your heels toward your bum, which should help activate your glutes and hamstrings. Lift and extend one foot, then lower your pelvis down to the floor and back up with that single leg. If you cannot lift and lower, hold the one-legged bridge position for 30 seconds. The majority of the work in this move should be concentrated in the back of your hips and legs, not in the quads or lower back.
Volume: One to three sets of five to eight repetitions, with one to two minutes of rest between sets. Perform this move one to three times per week.
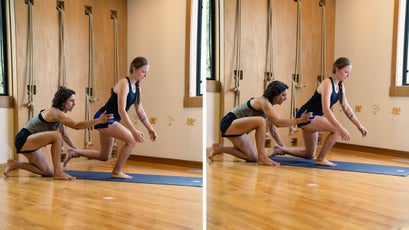
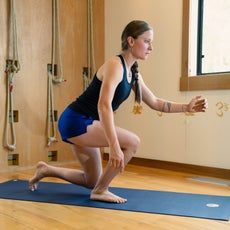
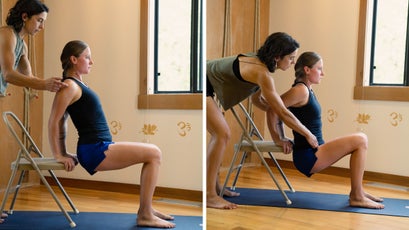
Reverse Lunge
What it does: When you walk, your glutes stabilize the pelvis and initiate hip extension, providing a powerful push forward that extends all the way down your posterior chain to the foot. This exercise helps you identify the origin of that movement while in a standing single-leg position. It also challenges balance.
How to do it: Begin by standing in a squat-ready position, with your feet hip-width distance apart. Shift your weight to one leg and extend the free leg behind you into a reverse lunge. Try to lower the back knee to within an inch of the floor and touch just the toes of that foot to the ground. Then engage your glutes and hamstrings on both sides to raise back up to the starting squat position with minimal back-foot contact time. This puts the bulk of the work on the front leg and should bias the glutes more than the quads. If you feel wobbly, reduce the distance of the reverse lunge or use two trekking poles for support. If it feels too easy, add free weights in both hands.
Volume: One to three sets of five to eight repetitions on each side, with two to three minutes of rest between sets. Perform this move one to three times per week.
Esther Smith, a doctor of physical therapy certified in Mechanical Diagnosis and Therapy, has specialized in treating athletes (specifically rock climbers) for the past decade. She is a storyteller, a mountain athlete, and a high-performance coach for the . You can find Smith’s written and video resources cataloged at and learn more about her physical-therapy practice at .