

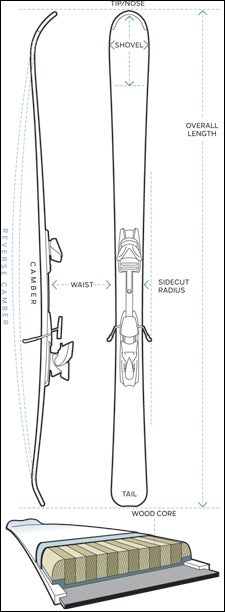
CAMBER
how to ask for custom skis
 How to ask for Custom Skis
Traditional gives you more control on groomers and ice, while reverse (upturned tips and tails) floats better in powder.
TIP
The amount of “rise” refers to how the tip is curved upward: shorter or low rise for sharper turns on hardpack, long or high rise for powder skiing.
OVERALL LENGTH
Long skis increase stability in all conditions, and the added surface area keeps you on top of the soft stuff, but short skis are easier to handle and quicker to turn.
SIDECUT
The depth the ski is cut from the nose to the waist, which determines its turning radius. Deep sidecut equals quick turns on the corduroy; shallow sidecut is for wide arcs on open terrain.
WAIST
Narrow (<75mm) allows for rapid edge-to-edge transfergreat for mogulsand carving precision, but you'll sink in fresh snow. Wide (95mm) means you'll float but also work to bring 'em around.
CORE
Most shops use wood over foam to increase durability. Heavy woods, like ash and maple, make strong, stiff, and stable skis. Softer woods, like an ash-fir blend, are just as durable but make for a slightly lighter and snappier ski.
FLEX
Determined by the thickness of the core and the stiffness of the structural layers. Racers want firm, but if you like bumps or tight chutes and powder, go soft.
GET SOME!
Wagner Custom, Telluride, Colorado () ScottyBob’s, Silverton, Colorado () Igneous Skis, Jackson, Wyoming () Folsom Skis, Boulder, Colorado ()
Suite Digs
How to construct a bombproof winter campsite to keep you warm and comfortable
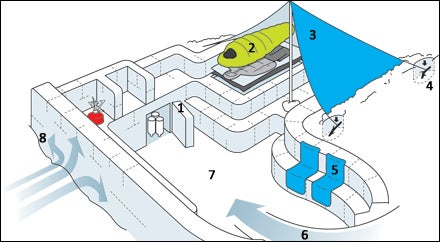
1. CLOSE THE DOOR!
Store your water bottles upside down (so the lids don’t freeze) in a small cupboard, using a snow block for a door.
2. BOOST YOUR BEDDING
Notch out a sleeping trench to keep you from rolling off your tarp, pad(s), and jacket. (The more layers you sleep on, the warmer you’ll be.)
3.
RAISE THE ROOF Pitch a floorless tent over your sleeping area (you’re seeing only half the tent here, of course). Use a snow-filled stuffsack to support the center pole; otherwise it’ll sink.
4.
“DEADMAN” YOUR TENT TO HOLD IT STEADY IN THE WIND
1. Dig a hole at the edge of the tent and tamp down the base.
2. Use parachute cord to extend your tent’s tie-downs.
3. Tie the cord to a stick using a three-to-one pulleyalso known as a trucker’s hitch.
4. Wedge the stick into the hole’s walls and bury it deep enough to pull the tent flush with snow level.
5. Bury the stick.
5. INSULATE
Bring extra pads to sit and stand on; you’ll stay much warmer.
6. RAMP IT
Build your one entrance into the kitchen, from the lee side of the site.
7. BURROW DOWN
Dig to roughly two-thirds your height below snow level, then carve out seats, a sleeping area, and a kitchen, adding lots of counters and shelves (might as well; you need the snow for a wall), then flatten and tamp down all surfaces.
8. WALL UP
Using the carved-out snow, build a wall on the windward side of your kitchen that reaches to head height.