

You’re railing that descent, nailing every line and feeling like a world champ, when��suddenly��you smash a wheel into a big square-edge rock. Quite literally, you can feel the air go out of the ride. Not much kills the stoke from a great spin quicker than a flat tire. This is why tubeless tires are increasingly popular for all kinds of cycling. These setups use a liquid sealant instead of an inner tube to hold air. As a result, they offer better protection against all kinds of flats��and enable you to run lower pressures than tube-type systems, increasing��traction and creating��a more comfortable ride. In the event you do get a puncture,��tubeless tires are also more likely to stay attached to the rim, which is safer.
But ask most riders about going tubeless and you’ll encounter a litany of horror stories about setup. Why are some tubeless installs easy and others a multi-hour thrash session��punctuated by merchant-marine��levels of cursing? In short: manufacturing standards and tolerances. Wheels and tires from different brands vary ever so slightly in actual size, so a tire that fits great on one wheel is an overly tight nightmare on another. The good news is that this is slowly improving. Because manufacturing standards are getting better, with stricter tolerances, it’s now much more likely than even��five years ago that you’ll be able to install and seat tubeless tires on the first try with a standard floor pump. Here’s a step-by-step guide.
Glossary of Terms
- Rim Tape:��Special, impermeable tape that seals a metal or carbon-fiber rim bed against air loss, especially around the spoke holes. You’ll��see people using��all manner of cheap DIY approaches (Gorilla Tape is popular), but we recommend using actual tubeless rim tape. It’s not that expensive, and it’s far better suited to the task.
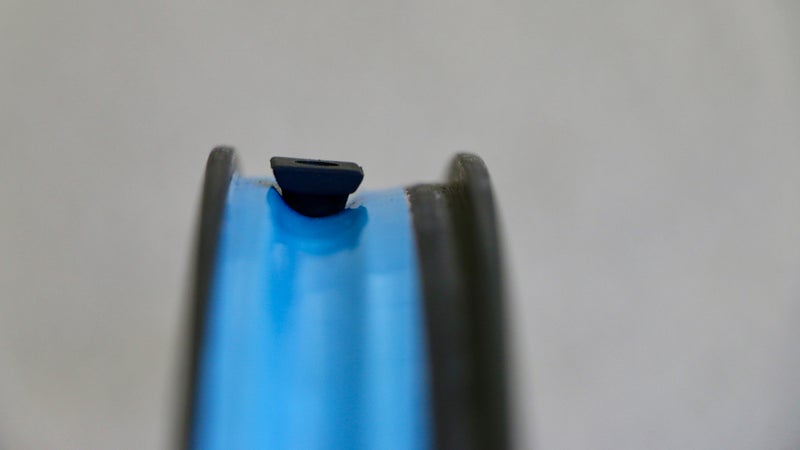
- Bead Lock: The part of the wheel rim that holds a tubeless tire in place. If you view a��tubeless bead lock’s cross section, it has a special shape—a square sidewall with a small bump on the inside of the rim bed. The matching tubeless tire bead is pressed into the bead lock by air pressure, where it seats, or locks, securely. The bump prevents the bead from blowing off under pressure, and it reduces the likelihood that it can come loose if the tire goes flat.
- UST: The original , created in 1999 by Mavic, Hutchinson, and Michelin. Instead of sealant, it used an impermeable layer in the tire casing to hold air. As a result, it was extremely heavy relative to modern systems. Today��it’s superseded by tubeless-ready��technology.
- Tubeless Ready: Refers to any tire and/or wheel rim that is manufactured so that it can be installed as tubeless just by adding sealant. For tires, this means that the bead has a tubeless-ready profile, and that the tire casing can be made airtight by adding sealant. For rims, it means that the rim bed is sealed against air loss (either by being solid material or through the addition of airtight rim tape), and that the bead lock has a tubeless-ready cross section.
- Tubeless Compatible: You’ll sometimes find this designation on rims or wheels that have the proper tubeless bead-lock profile��but which need the addition of airtight rim tape to become tubeless ready.
What to Buy
Tubeless-Compatible or Tubeless-Ready Wheels and Tires
You’ll need tubeless-compatible��or tubeless-ready��wheels to start. This is governed by the rim profile itself (see the glossary, above). Most gravel and mountain-bike wheels these days are compatible; road bikes are not always so. But in any case, check manufacturer specs.
A warning: Do not��under any circumstances��try to make a wheel that is not listed as tubeless compatible into a tubeless system. If you’re lucky, all that will happen is the tire will blow off the rim in your garage and spray sealant everywhere.��If you’re not lucky, the tire will hold just long enough for you to go on a ride, and then it will blow off, likely causing a crash.��The same goes for tires: the bead on non-tubeless-ready tires will not hold securely in the bead lock and can blow off without warning.
Tubeless Rim Strips or Tape
Many higher-end wheelsets are tubeless ready right out of the box. For others listed as tubeless compatible, you’ll need to seal the rim bed (namely the spoke holes) with airtight tape. Good brands are ,��, and . You’ll need to match the tape width to your rim width.
Sealant
This special elixir typically features very small solid particles of rubber or latex in a liquid suspension. When you’re��riding, the particles slosh around the inside of the tire, where they find and plug small leaks. Good bets are ,��, and . Buy an 8-to-16-ounce bottle. Sealant doesn’t dry out in the bottle over time like it does in tires, and you may want some extra in case the initial installation doesn’t go smoothly. Some bottles of sealant come with a measuring cup; if yours doesn’t, you’ll��need a cup that has measurement markings in ounces.
Valve Stems
Tubeless tires use special valve stems that create an airtight seal on the inside of the rim bed to prevent air loss. The rubber grommet that forms the seal sometimes has to be matched to the profile of your wheel’s rim bed (so-called��universal��valves claim to work with almost any system). The best valves have removable cores. ,��, and make good universal valves with removable cores.
Tubeless-Ready Tires
The sealant’s job is to plug holes, but it won’t seal a non-tubeless tire. More important: non-tubeless tires don’t have the specially shaped bead to lock to the rim. We’ll steer clear of recommendations here. Tires are personal and, for gravel and mountain-bike riding especially, the best choices are highly geography- and conditions-specific. Ask around for what others in your area use and trust.
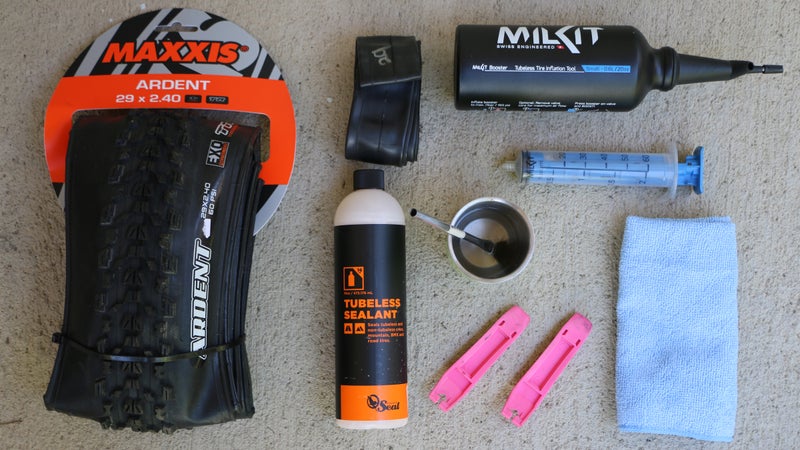
Tools
You’ll need a , sturdy , a (a very small and inexpensive wrench), a clean rag, a small paintbrush, some rubbing alcohol, and an old cup for soapy water.
Optional: Sealant-Injector System
These are big syringe-like��devices��that install the sealant directly through the valve stem. They’re fairly affordable ($10 to $30) and long-lasting. They’re��also easy to use and much less likely to spill than the simple plastic measuring cup that comes with most bottles of sealant. Some have a needlelike attachment that can also be used to pull sealant back out of tires—useful if you’re swapping tires��or want to store a bike for winter without letting the sealant congeal. ���ٲ���’s��makes a basic system, but I prefer the or versions (note: Mil-Kit’s system is more expensive but comes with universal valve stems).
Optional: Tubeless Inflation System
These are basically reusable air chambers that you pressurize with a floor pump, then place over the valve stem and use to inflate the tire quickly. They’re helpful because seating tubeless tire beads to the rim often requires a high volume of air delivered fast, and floor pumps can struggle to do that. Brands include ,��, and��. But these items are designed for one task only, which may not justify the price ($50 to $100) if you use them rarely. If you’re only installing tubeless tires on rare occasions, you can also use a to seat beads. Many people use standard air compressors of the sort you need for home-improvement projects.
The Process

Step One: Prep the Rim
Tools: Rag, rubbing alcohol
Whether you’re working with new wheels or ones you’re converting, make sure they’re clean. Dip a rag in rubbing alcohol, and thoroughly wipe down the rim bed, rim tape, and internal sidewalls. Pay special attention to removing any debris from��the bead hook, where the tire will seat. Check to ensure that the tape is even and tight, with no wrinkles or gaps that could leak air. Wipe dry.
Step Two: Install the Tire with a Tube First
Tools: Tire lever, floor pump, tube
That’s right: use a tube first. Why? It’s an easy way to get at least one of the tire beads firmly seated to the bead lock��and to work out the kinks in a tire bead after it’s sat folded in storage.
Unfold the new tire, and seat one side in the rim bed. Many tires, especially mountain-bike tires, are directional or even front- or rear-specific; check to make sure it’s in the proper orientation before installing. Tip: line up the center of the tire logo over the valve stem, as this can make it easier to find and fix leaks on rides.
Inflate an inner tube just enough that it holds shape. Insert the valve in the rim’s valve hole, and tuck the tube into the tire. Finally, deflate the tube a bit, and install the other side of the tire. The bead will likely be tight in the last quarter or so. Use a tire lever, and carefully lift the bead into the rim well, taking care not to pinch the tube between the tire and rim. Once seated, push the tire bead toward the center of the rim bed, and visually check��to make sure the tube isn’t pinched.
Inflate the tire, stopping at about 20 psi��to make sure that the tire bead isn’t bulging out over the rim in any location. Resume pumping to a few psi��short of the maximum inflation listed on the tire sidewall. You’ll hear some snaps and pops. This is normal; it’s the tire bead seating in the rim lock. Finally, set the wheel in a warm, sunny location for 15 to 20 minutes. The heat��softens the kinks in the tire bead, and—if you’re setting up wheels for tubeless for the first time—helps ensure that the rim tape’s adhesive is fully bonded to the rim and won’t leak.
Step Three: Take Out the Tube. Install the Tubeless Valve Stem.
Tools: Tire lever
Take the wheel out of the sun, and let it cool back to room temperature. Deflate the tire. Carefully push only one side of the tire into the rim bed, then use the tire lever to lift that bead off the rim. Remove the tube, leaving the other tire bead seated in the rim.
Install the tubeless valve by threading the knurled nut as tightly��as it’ll go with your fingers. Don’t use a wrench or pliers; overtightening could crack the rubber gasket on the valve stem and cause a leak. Make sure the valve you’re using fits the rim-bed profile (see “What to Buy,” above). A poor fit could leak.
Step Four: Install and Seal the Tire
Tools: Tire lever, tire sealant, measuring cup or injector, valve-core remover
If you’re using a sealant-injector system: Reinstall the loose tire bead, taking care not to dislodge the bead on the other side of the tire. Use the valve-core remover to unthread the core counterclockwise, then remove it and set it aside. Shake the sealant bottle for 10 to 20 seconds to thoroughly mix its contents, then measure out the appropriate amount for your tire size into the injector chamber:
-
Two ounces for road tires (up to about��28 millimeters)
-
Three ounces for 700c gravel or 27.5 mountain tires
-
Three to four ounces for most 29er mountain tires
-
Five to six ounces for plus-size mountain-bike tires
Seat the injector securely on the valve stem (or push the needle fitting through the valve stem), and then carefully inject the sealant into the tire. Reinstall the valve core.
If you’re just using a sealant cup: Don’t worry about removing the valve core, since you’re not using it to add sealant. Reinstall the loose tire bead, but leave a final section unmounted. Prop up the wheel with this section closest to the ground��but the opening tilted upward to prevent spillage.��Shake the sealant bottle for 10 to 20 seconds to thoroughly mix its contents, then pour the appropriate amount into the cup, and carefully pour that directly into the tire at the unmounted section. Grab the wheel and��gently��rotate the unmounted section up to 12 o’clock, so that the sealant flows into��a fully mounted section of the tire where it’s less likely to leak out, and wrestle the final section of tire bead onto the rim (you may need the tire lever).
Step Five: Inflate and Pray
Tools: Floor pump, soapy water, small paintbrush
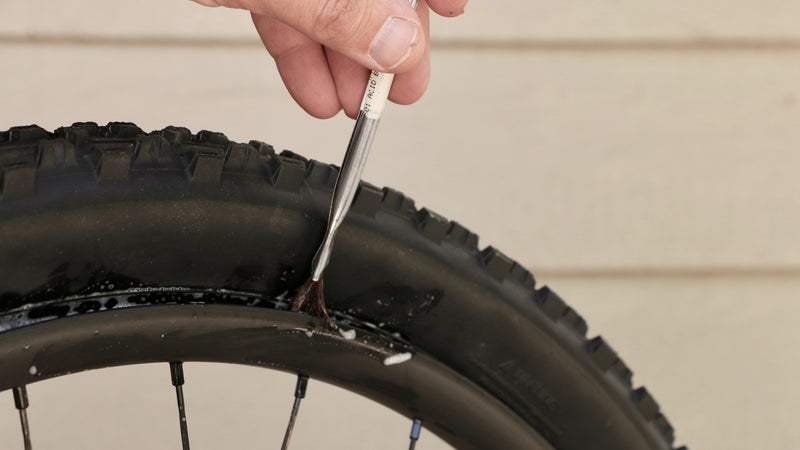
Seating tubeless tires takes a lot of air rushing into the tire very fast��to seat the tire bead into the rim lock. You might be able to do this with a floor pump, but you may need a higher-volume air source.
Take the paintbrush and dip it in the soapy water, then run it along the tire sidewall where the loose tire bead and rim bead lock meet. The soapy water helps the tire bead slip into place more easily.
If you’re using a floor pump: Because you’ve already seated one side of the bead, you may be able to inflate the tire with a floor pump. It takes some effort and maybe a little luck. First, thread the wheel skewer or axle through the hub—that��provides something to grab as you spin the wheel to disperse sealant. Then��firmly seat the pump chuck on the valve stem (making��sure the stem core is fully open), and pump full strokes as fast as you can to get the installed but unseated tire bead into the rim’s bead lock. Again, you’ll hear those telltale snaps and pops. If you hear that, keep pumping! Pump to a few psi��short of the maximum inflation listed on the tire sidewall. Quickly remove the pump chuck, grab the quick-release lever on the wheel skewer or axle, and spin the wheel for a minute or so, rotating the axis back and forth. This helps distribute the sealant evenly inside the tire. If you see sealant spraying out anywhere for more than a few seconds, stop; the tire’s not fully seated. Also: if you are pumping quickly for at least 30 seconds but the tire won’t hold any air, stop; the tire likely won’t seat with just a floor pump.
Secondary protocol: If you can’t get the tire bead to fully lock in the rim, you’ll need a higher volume of air delivered faster.��This is where the CO2 cartridge inflator you normally use for trailside-flat repairs comes in��or the special tubeless-inflation systems we mentioned above. Another option is��a pump��with integrated booster chambers, like the����or the��, although these get mixed reviews.
In any case, the process is basically the same with a booster or combo pump: charge the booster chamber, securely fasten the inflator chuck around the valve stem, then release the air into the tire. If you’re using a CO2 inflator, use the largest cartridge you can find for mountain tires (up to 20 grams).��If the CO2 cartridge successfully seats the bead, it may still not be at the full pressure needed to ensure a complete seal to the system. Remove the inflator, and switch to the floor pump, topping off the pressure to a little less than the listed maximum sidewall pressure.
Something to consider: stand-alone tubeless boosters cost��$50 or more. Booster and pump combos cost��$120. Pancake-style air compressors start at $99, plus $30 or so for a Presta attachment.
Whichever method you use, once the tire seats, grab the wheel by the quick-release or through-axle lever, and spin it to disperse the sealant inside. Success? Awesome. Check for obvious sealant leaks at the sidewall and valve stem. If you don’t see any, install the wheel on the bike, and ride slowly around the neighborhood—this helps the sealant foam and plug any microscopic hole in the system. Leave the tire inflated at the higher pressure, which helps ensure that the tire stays sealed.
If this process didn’t work, the problem may not be something you can fix at home. In that case, we recommend going to a shop.