


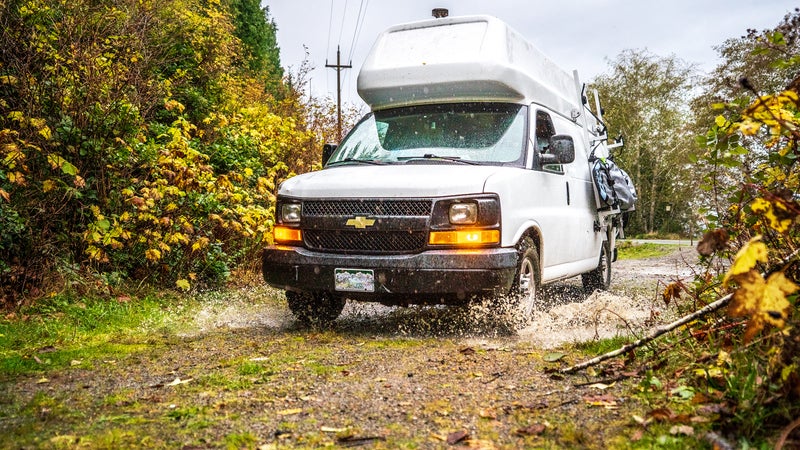
At the beginning of last summer, my girlfriend and I impulsively purchased a retired plumbing van (a 2006 all-wheel-drive��Chevy Express with a 30-inch fiberglass topper), with the intention of converting it into a cushy adventuremobile. Our dream? To embark on an epic climbing and surfing trip from Canada���ٴ� Mexico. We figured that the build would take six to eight weeks and that we’d be in Canada by the end of August—just in time to catch the last of summer and chase the sun south come fall.��
Oh, the naivete.��
Despite having some help from a friend who recently launched a��, we drastically overestimated our skills (absolutely nonexistent) and underestimated the difficulty of building out such a vehicle from scratch (the hardest thing I’ve ever done, bar none). Be warned, you unskilled van builders who see the build-out process through the rose-tinted filters of Instagram: it requires stalwart resolve, it brutally assaults the ego, and it takes much longer than anticipated. We hit the road two months late.��
That said, nearly a year after we started this journey, I look back at the blood, sweat, and, yes, uncountable tears of that time with quiet satisfaction. It was all worth it. Our rig is gorgeous and cozy. We outfitted it with top-of-the-line appliances, electronics, and accessories that inject life on the road with the comforts of home.
In this piece, I’ll break down the��essential items we installed inside the van, such as the stove, fridge, woodstove, and more. I’ll also get into the external accoutrements that make the rig the adventuremobile that it is: the surf rack, bike rack, solar panels, and awning. Some of these products were easy to install.��Some should’ve been easy, but we made mistakes. Others were just finicky bastards. And some required professional help.��
Whether you’re building out your own rig from scratch, updating your existing setup, or just fantasizing about hitting the road in a custom-built van, read on, learn from our mistakes and misadventures, and remember that those #vanlife dreams aren’t going to manifest themselves.
Dometic Sink/Two-Burner Cooktop Combo,��$490
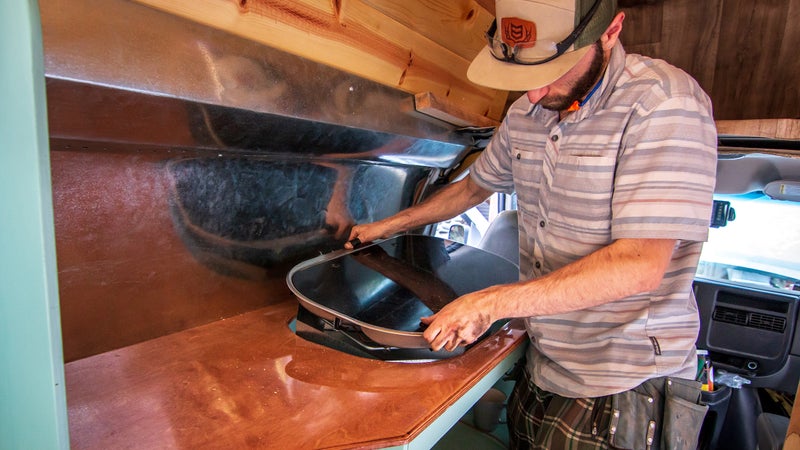
As someone who loves to cook, I’m still getting accustomed to our four-foot-long kitchen, which is centered around this . The offset burners are great for our minimalist one-pot, one-pan setup��but too cramped to use two pans at once.��
Ease of Installation
Installing the sink-stove combo was not exceptionally difficult, though it was daunting. It’s a time-consuming endeavor, to be sure, as you need to deal with cutting the counter to size as well as plumbing, gas, and more, but this duo negates the need to install a sink and a stove separately.
Favorite Feature
The glass lid. We’re especially stoked that it flips down when the stove is not in use, adding what feels like an acre to our tiny kitchen.
Cubic Mini Cub Wood Stove, $458
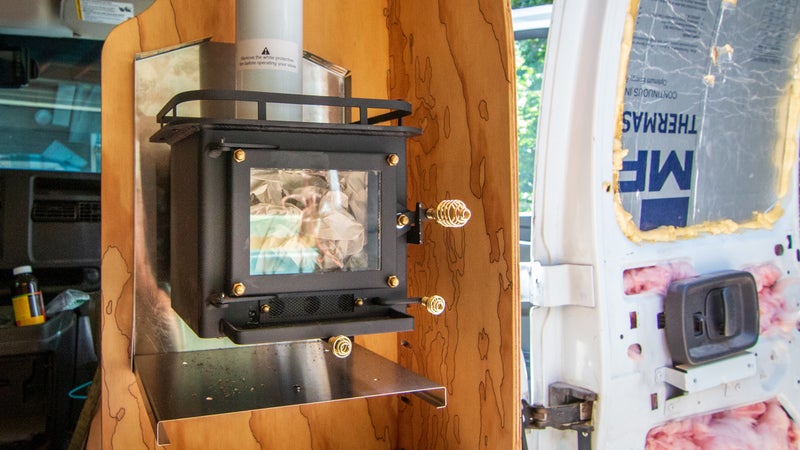
Our ��is a conversation starter—everywhere we park, someone strolls over to ask, “Is that a chimney sticking out of your roof?” After ample research, we realized that these are much more affordable than most other woodstoves on the market, and if you follow its installation guidelines, the setup is quite safe.��We’ve been using it regularly, and so far, our van has yet to burst into flames (knock on wood).��
Ease of Installation
Figuring out exactly where to position the fireplace is tough, as you have to carefully follow the Cubic Mini’s strict safety regulations—the stove needs to be a certain distance away from all combustibles, and the same goes for the flue pipe. The hardest part of the installation for us, however, was cutting the exit hole in the roof. If your roof is flat and you’ve got a jigsaw, it’s a straightforward task. We were cutting a hole through an outrageously angled fiberglass topper, not to mention two-inch-thick insulation, three-quarter-inch ceiling panels, and the occasional framing two-by-four. I highly recommend thinking about where you’re going to��install��the fireplace before you start building out your ceiling and walls.
Favorite Feature
We love watching the orange flames lick at the glass door from the cozy confines of our bed. It’s a show that’s infinitely better than Netflix.
Dometic CFX 35 Electric Cooler,��$800
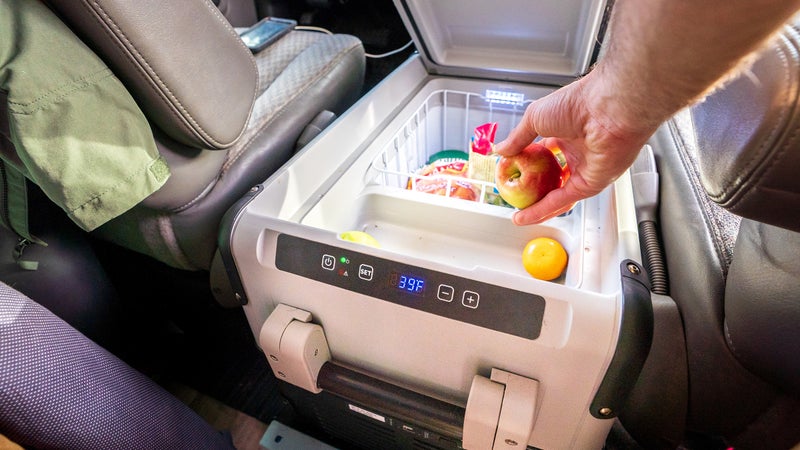
��is a rugged, energy-efficient���ٴ�p-loading cooler that made the most sense for our build, because it sits snugly between the front seats, a space that would have otherwise been hard to use efficiently. I suppose that makes it the coolest armrest ever (yep, just did that). Unfortunately, it’s on the small side, and there’s no separate freezer compartment, but those disadvantages are worth it when you consider how little power it uses.
Ease of Installation
Because we went with a top-loading cooler instead of a built-in fridge, installation was fairly simple;��the only complication was the wiring. The CFX comes with both a standard 110-volt plug and a 12-volt cigarette-lighter jack, but neither of these were optimal for our setup. To make the fridge run straight from our auxiliary battery, we cut off the cigarette lighter, connected fresh wires, and ran them back to the fuse block. Then��we popped in the corresponding fuse, set the cooler in between the front seats, and drilled a piece of wood into the floor to keep the fridge from sliding around.��
Favorite Feature
The minimal power draw. As all vanlifers know, keeping power needs low allows you to spend more time in the boonies.
BFGoodrich KO2 All-Terrain Tires,��Price Depends on Size
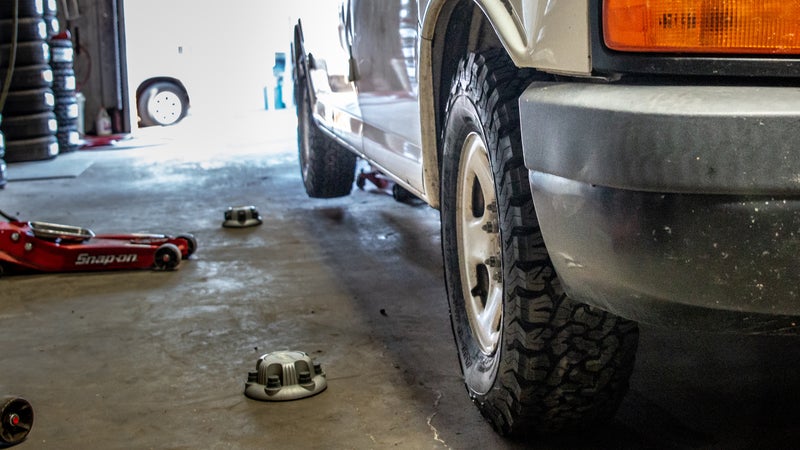
Our van was in decent shape when we bought it, but one of the things that we had to upgrade were the tires. The originals were fine for a plumbing work van, but they weren’t prepared for romping on unforgiving back roads with a fully loaded camper van. We ended up getting a set of —what the brand calls its “toughest all-terrain tire ever”—based on the solid reviews, excellent traction, lauded longevity, and performance in snow. Not to mention, they make our rig look more badass. So far��these tires have handled well��both on mountain passes in the Sierra��as well as muddy, potholed roads on Vancouver Island and in Baja, Mexico.��
Ease of Installation
As quick as swiping plastic. We left this one to the pros.
Favorite Feature
The overkill load capacity gives us peace of mind that we’re not going to blow out a tire on the highway or get stranded far from civilization.
Dometic Fan-tastic Vent 7350,��$319
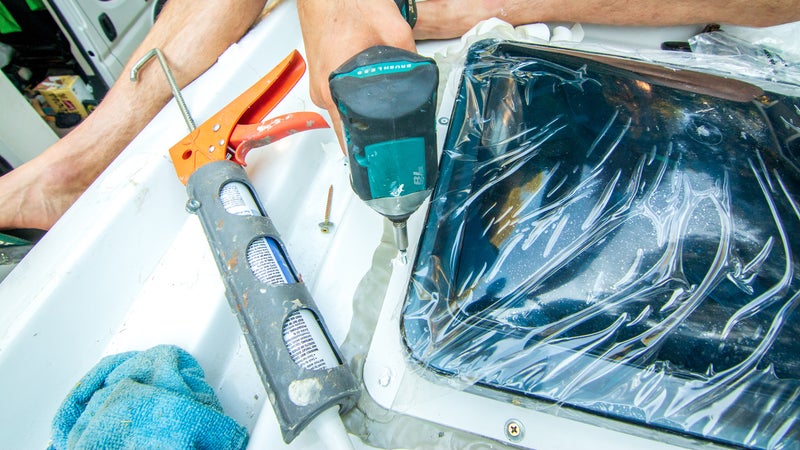
Fans are a must when living in a van: they suck out cooking smoke and the stink of dirty gear, bring in fresh air, and can provide discreet air circulation while camping out incognito. After getting multiple recommendations to check out the��, we went with the higher-end 7350 option, which has remote, reversible airflow, multiple speeds, and a rain sensor.
Ease of Installation
I have a love-hate relationship with this fan—I love using it, but I hated installing it. Strike one:��the fan arrived with a broken fuse. Then, when I got a new fuse and plugged it in, the fan short-circuited. Dometic sent out a replacement, and we installed it, but��the fan would only go three speeds (three speeds is plenty, but the fan purportedly has 13). After spending significant time on the phone with Dometic customer-service representatives, they sent out a third fan. Believe it or not, the same issue persisted with that one, leading me to the ironclad conclusion that we were the idiots and doing something wrong. However, even Dometic’s crack customer-service team couldn’t figure out what the problem was, so at this point, we’ve sucked it up and live with the three speeds.
Favorite Feature
The handy remote, which allows us to navigate through all three fantastic speeds.
Rear View Safety Chevy Express Third Brake Light Backup Camera,��$300��
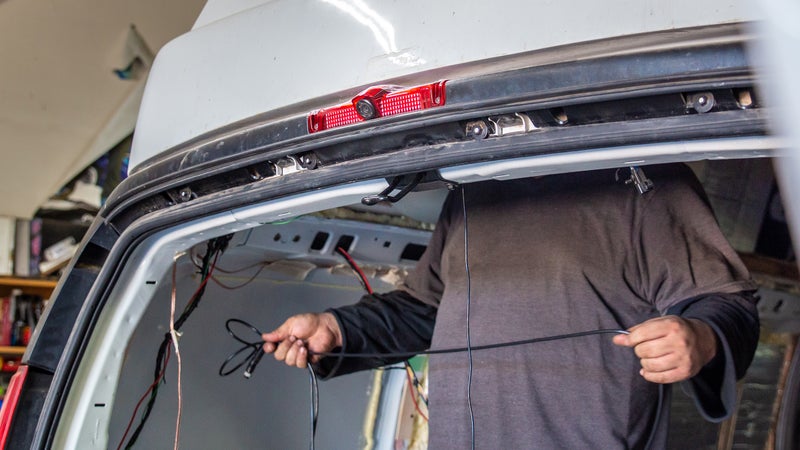
The Chevy Express is on the small size for a van build-out and is subsequently quite maneuverable, but when it’s fully loaded and there are bikes on the rack, having a backup camera is a must. We went with a brake-light kit from . It’s inconspicuous, as the brake light has a nearly imperceptible protuberance where the camera lens sits. Our sole gripe with the system is that the camera is nearly useless at night, since the it focuses on our brightly lit bikes, failing���ٴ� capture the hazards lurking in the darkness.
Ease of Installation
Given the fact that this wiring has to be done precisely, and we’re amateur electricians on a good day, we decided that professionals should complete this task. However, Rear View Safety includes a user-friendly guide in case you’re hoping to install it yourself.��
Favorite Feature
The unassuming camera.
Springfield Marine Table Pedestal, $523
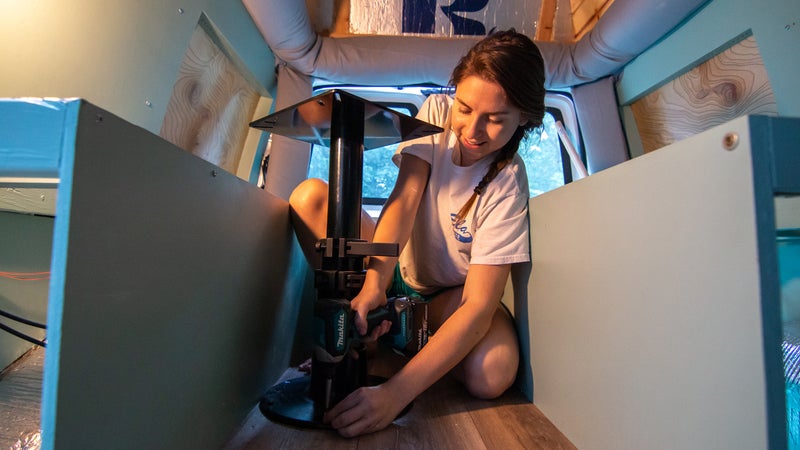
Van builders often rely on materials and products from boat-building companies—the small quarters of sailboats and harsh conditions of the sea necessitate burly yet space-efficient products that work well in both scenarios. Like many others before us (thank you, Pinterest), our design revolved around a bed that converts into a table. We used an .
Ease of Installation
Sailors would say it was a breeze—all you need is an impact driver and screws.��
Favorite Feature
We love how the table is completely hidden when we’re in sleep mode. Toss off the sheets, remove the cushions, and the table easily pops up—perfect for getting some work done on the road or having two friends (maximum!) over for dinner.��
Thule HideAway Awning,��$900
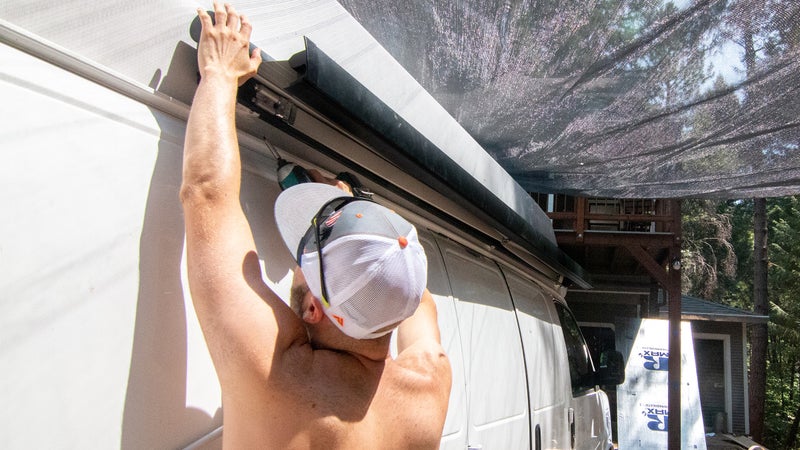
We debated getting an awning. It’s sweet if you’re staying put for two or three days at a time��but can be a pain if you’re bouncing around more frequently. We ended up going with . We love how the ten-foot-long shade basically doubles our living space when it’s open, as well as the sleek aesthetic when it’s stowed.��
Ease of Installation
While the awning is simple to set up, we had difficulties installing it. This was due to a combination of three things: user error, unclear directions (Thule’s customer-support hotline mentioned that the company is in the process of rewriting its instructions), and the pesky curve of our van’s roof.��
Favorite Feature
Shade. It made sweltering days in Baja much more enjoyable.
Kuat Pivot��and NV 2.0 Bike Rack,��$329��and $649, Respectively
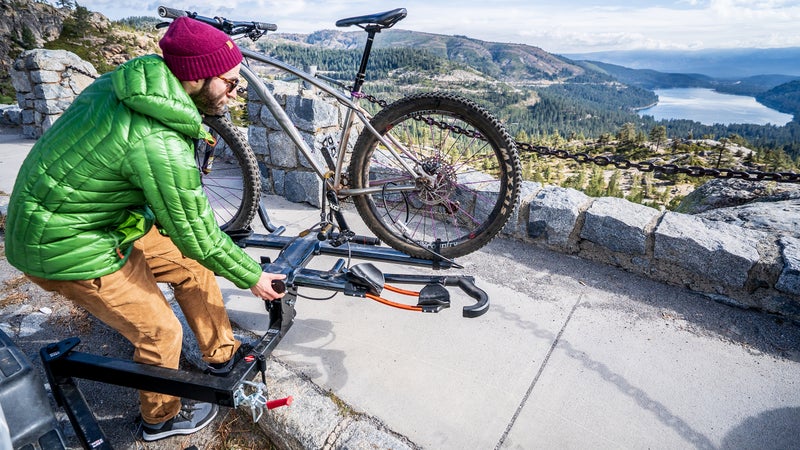
��is a high-end, easy-to-use two-bike rack with covert cable locks that retract into the body of the rack. Most important, it’s compatible with the brand’s , a hitch-mount system with a 250-pound carrying capacity that swings out to allow access to the rear doors. So far��this system has been ideal, and we never hesitate to swing the Pivot open to access our gear storage.
Ease of Installation
Installation is straightforward for both of these pieces of equipment, and Kuat’s instructions are well written and clear.
Favorite Feature
The Pivot—accessing our rear doors was nonnegotiable for our van setup!
��
Vertirack Surfboard Rack,��Price Depends on System
Given the fact that we have solar panels and a chimney on our roof, traditional surfboard roof racks were out of the question. We are able to slip a single shortboard underneath the bed, but a seven-foot-six-inch��mid-length isn’t easily stashed inside a van. Discovering ��was a revelation: the lightweight yet strong aluminum struts attach to the side of the vehicle, while rubber arms and stretchy straps hold boards securely at highway speeds. Smitten by the idea��of allowing our solar panels to soak up the sun, we went with a two-board rack, and we can now haul up to three boards at a time.
Ease of Installation
Installation was made tough by the curves of our van’s roof and the way the fiberglass topper encroaches into the rain gutter. However, after scratching our heads, talking it over with Vertirack, and bending the bottom portion of the gutter clamps in a vice per its��recommendation, installation was a total success, and we couldn’t be happier.��
Favorite Feature
The suction cups, which kept us from having to drill holes into the metal walls of the van.��
This item is currently unavailable.��
Renogy Solar Panels,��$164
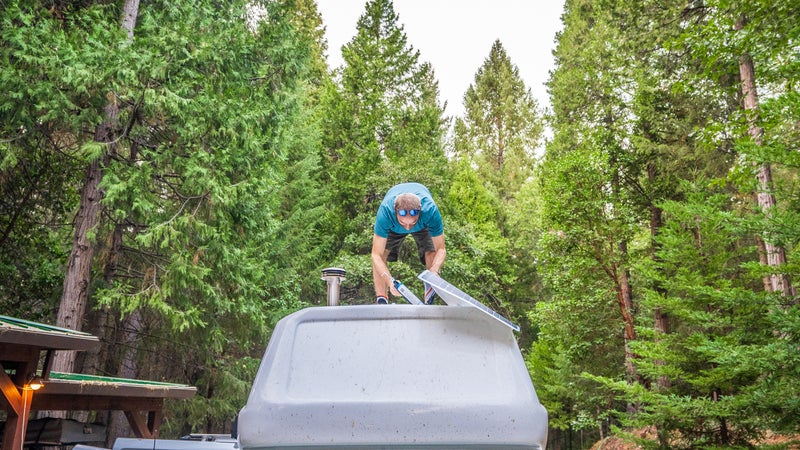
To power our appliances, we opted for two of ,��because they’re much lighter than their stiffer counterparts��and don’t require more holes drilled into the roof. But��they’re more expensive.��
Ease of Installation
Despite the frustratingly funky curves of our fiberglass topper, we were able to get the flexible panels to adhere to the roof of the van with basic silicone caulking. We cleaned the roof, positioned our solar panels where we wanted them, used way too much silicone, and weighted the panels down overnight. Unfortunately, it rained as we were installing the first panel, and the silicone didn’t cure properly, so we had to scrape it off with razor blades, the roof, and do it over again. I don’t recommend this.
Favorite Feature
The panels are lightweight. Keeping pounds off the roof is crucial, especially with such a naturally top-heavy build.